How to Set Up Starknet Devnet and Frontend for Smart Contract Development
How to Set Up Starknet Devnet and Frontend for Smart Contract Development
How to Set Up Starknet Devnet and Frontend for Smart Contract Development
Date: September 8, 2023
Are you looking to deploy and test your smart contracts on Starknet Devnet? This guide will walk you through the complete environment setup, including setting up Starknet Devnet and creating a frontend for smart contract development. Let's get started!
1. Installing Pyenv
Starknet Devnet requires Python 3.9. To manage Python versions effectively, we recommend using pyenv, similar to nvm for Node.js.
Why Use Pyenv?
- Avoid conflicts with other Python projects.
- System Python (for macOS/Ubuntu users) should not be disturbed.
Installation Steps
For Ubuntu/Debian users:
sudo apt update
sudo apt install build-essential libssl-dev zlib1g-dev \
libbz2-dev libreadline-dev libsqlite3-dev curl \
libncursesw5-dev xz-utils tk-dev libxml2-dev \
libxmlsec1-dev libffi-dev liblzma-dev
For Fedora/CentOS/RHEL:
sudo yum install gcc zlib-devel bzip2 bzip2-devel \
readline-devel sqlite sqlite-devel openssl-devel \
xz xz-devel libffi-devel
For macOS users:
brew install openssl readline sqlite3 xz zlib
Then, install pyenv:
curl https://pyenv.run | bash
Update your .bashrc file to include pyenv in your PATH. Open it with:
nano ~/.bashrc
Add the following lines to the end of the file:
if command -v pyenv 1>/dev/null 2>&1; then
    eval "$(pyenv init -)"
fi

export PATH="~/.pyenv/bin:$PATH"
eval "$(pyenv init -)"
eval "$(pyenv virtualenv-init -)"
Save and exit the text editor. Then, run:
exec $SHELL
For more information, refer to the Real Python guide on managing multiple Python versions using Pyenv.
2. Installing Python 3.9 using Pyenv
Install Python 3.9 using pyenv:
pyenv install 3.9
Verify that Python 3.9 is installed:
pyenv versions
You should see something like:
system
3.9.18
3.9.18/envs/env
3.10.13
Ensure that Python 3.9.* is available.
3. Initializing a Virtual Environment using Pyenv
Once you have pyenv and Python 3.9.* installed, create a new virtual environment:
pip install virtualenv
pyenv virtualenv 3.9.18 starknet_env
Activate the virtual environment:
pyenv local starknet_env
exec $SHELL
pip install starknet-devnet
4. Starting Starknet Devnet
To start Starknet Devnet, simply run:
starknet-devnet
Successful result;
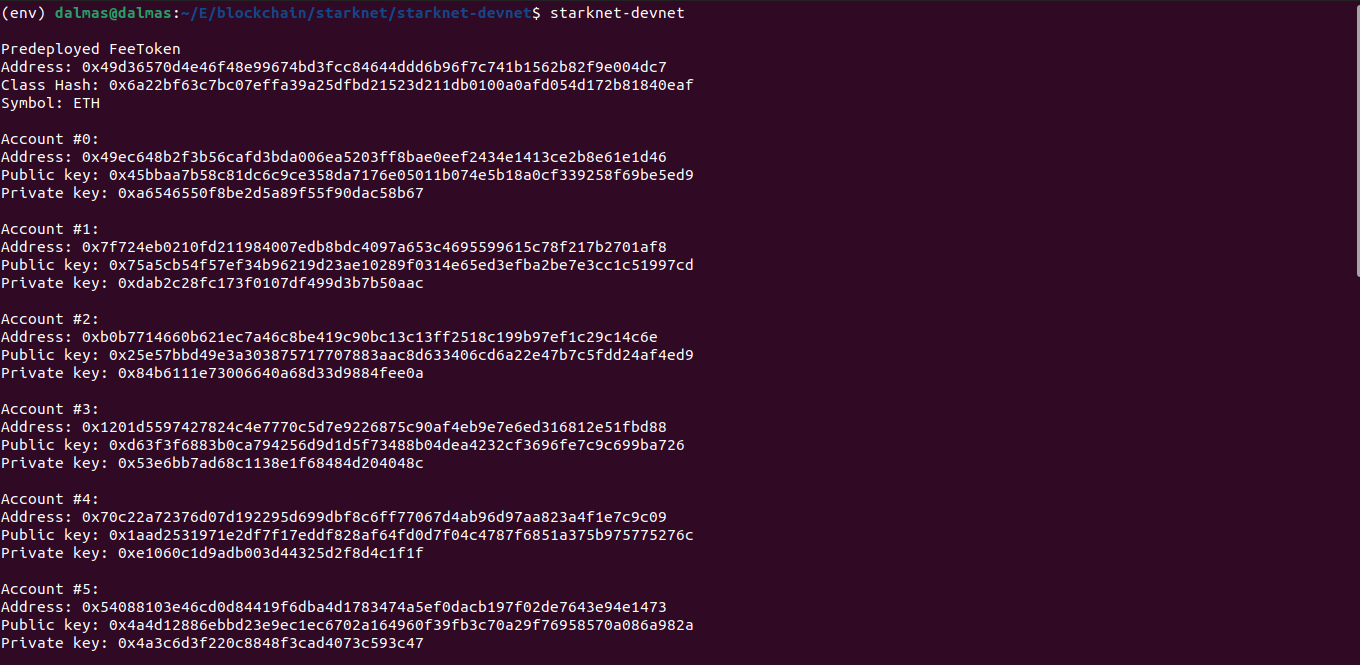
5. Generating Signer Account
i. Creating a Keystore
Create a directory for your keystore:
mkdir ~/.starkli-wallets/deployer -p
Generate a keystore:
starkli signer keystore from-key ~/.starkli-wallets/deployer/account1_keystore.json
Select an account from the list displayed when you ran starknet-devnet. Get the private key from it and provide it as requested.
To check the created keystore:
cat ~/.starkli-wallets/deployer/account1_keystore.json
ii. Creating an Account Descriptor
Run the following command to generate a wallet class hash:
starkli class-hash-at <ACCOUNT_ADDRESS> --rpc http://0.0.0.0:5050/rpc
Replace <ACCOUNT_ADDRESS> with the account address of the selected account. Then, open another terminal and run:
nano ~/.starkli-wallets/deployer/account1_account.json
Paste the following into the file, replacing placeholders as necessary:
{
    "version": 1,
    "variant": {
        "type": "open_zeppelin",
        "version": 1,
        "public_key": "<ACCOUNT_PUBLIC_KEY>"
    },
    "deployment": {
        "status": "deployed",
        "class_hash": "<SMART_WALLET_CLASS_HASH>",
        "address": "<ACCOUNT_ADDRESS>"
    }
}
6. Building a Smart Contract
If you don't have a contract, clone one using the following link:
git clone https://github.com/foundry-rs/starknet_forge_template.git
Then, build the contract:
scarb build
7. Declaring the Smart Contract for Deployment
starkli declare path/to/sierra.json-file --account path-to-account-descriptor --keystore path-to-account-keystore --rpc http://0.0.0.0:5050/rpc
Example:
starkli declare target/dev/*.sierra.json --keystore ~/.starkli-wallets/deployer/account1_keystore.json --account ~/.starkli-wallets/deployer/account1_account.json --rpc http://0.0.0.0:5050/rpc
This generates a class-hash for deployment.
8. Deploying the Smart Contract
starkli deploy generated-class-hash-from-declaring --account path-to-account-descriptor --keystore path-to-account-keystore --rpc http://0.0.0.0:5050/rpc
Example:
starkli deploy <class-hash-here> --keystore ~/.starkli-wallets/deployer/account1_keystore.json --account ~/.starkli-wallets/deployer/account1_account.json --rpc http://0.0.0.0:5050/rpc
This generates a contract-address for interaction.
9. Calling the Smart Contract
starkli call contract-address method --rpc http://0.0.0.0:5050/rpc
Example:
starkli call contract-address get_balance --rpc http://0.0.0.0:5050/rpc
10. Invoking the Smart Contract
starkli invoke contract-address method args --keystore ~/.starkli-wallets/deployer/account1_keystore.json --account ~/.starkli-wallets/deployer/account1_account.json --rpc http://0.0.0.0:5050/rpc
Example:
starkli invoke contract-address increase_balance 200 --keystore  ~/.starkli-wallets/deployer/account1_keystore.json --

account  ~/.starkli-wallets/deployer/account1_account.json --rpc http://0.0.0.0:5050/rpc
11. Creating a Vite App
Prerequisites
- Node.js (version > 12 and < 20)
- npm, yarn, or pnpm
npm create vite@latest frontend
If the above command fails, run:
npm i -g vite
Then create the Vite app as shown above.
After creating the app, navigate to the frontend directory and install the necessary packages:
cd frontend
npm i
npm install starknet
12. Setting up the App to Make Calls to the Smart Contract
If you've reached this step without any errors, open the app.jsx file in the src folder and replace its contents with the provided code. Make sure to update placeholders like <PRIVATE_KEY>, <ACCOUNT_ADDRESS>, and <CONTRACT_ADDRESS>.
import React from 'react'
import { Contract, Account, Provider } from 'starknet'
// Create a file called abi.json in  your assets folder under src and paste the sierra.json file generated by scarb build that you declared earlier.
import { abi } from './assets/abi.json'

const PRIVATE_KEY = import.meta.env.PRIVATE_KEY // Pick an account and pass its private key here
const ACCOUNT_ADDRESS = "0x52c40906327dc0f016115c0a921fef085a44ecf64ae588ebc9a376dba0607c2" // Account address of the selected account from starknet-devnet

/* The contract address below is modified, also modify yours and remove any zeros after x ie
if your contract address is 0x004236... or 0x04236... - remove the two/one zero(s) after x to be
0x4236...
*/
const CONTRACT_ADDRESS = import.meta.env.CONTRACT_ADDRESS // Contract address

const provider = new Provider({ rpc: { nodeUrl: "http://0.0.0.0:5050/rpc" } })
const account = new Account(provider, ACCOUNT_ADDRESS, PRIVATE_KEY)
const contract = new Contract(abi, CONTRACT_ADDRESS, account)

const App = () => {
console.log(PRIVATE_KEY)
async function callContract(){
    const res = await contract.get_balance()
    console.log(res.toString())
}

async function writeToContract(){
    contract.connect(account)
    const myCall = contract.populate('increase_balance', [35])
    const res = await contract.increase_balance(myCall.calldata)
    console.log(res)
}

return (
    <div>
    <button onClick={callContract}>Call Contract</button>
    <button onClick={writeToContract}>Write to Contract</button>
    </div>
)
}

export default App
Now you're ready to develop and test your Starknet smart contracts with a frontend application!
Happy coding!
Starknet Devnet, Smart Contract Development, Pyenv Installation, Virtual Environment Setup, Starknet Smart Contracts, Frontend Development, Decentralized Applications (dApps), Starknet Tutorial, Blockchain Development, Ethereum Development
You might also be interested in
How to Deploy a Django Application to cPanel